Wednesday 18 April 2018

My Little Princess Baby Album

Hello dearies....I am back on the blog with my new project using My little princess paper pack from The Element craft Studio..

Glimpse of My little Princess album..


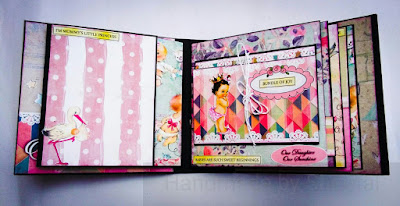
The papers are perfect for albums..cards..
I loved the way it came out...
For the cover I made a shaker embellishment and have fussy cut the elements from the pack..
Here is the video overview of this album---

                Hope you all liked it....

 Thankyou
SHEETAL THAKORE


Sunday 15 April 2018

Altered Sewing Machine Drawer


Hello friend jinal here from jinal arts.... Today i am going to share with you most interesting and a very different decoupage article a sewing machine.....When I received my DT kit with this drawer, felt so happy and was clear about my concept of what I wanna do with this beautiful base...As professionally being a Fashion designer, I am used to work on sewing machine and this base made me remind my designing course... Feeling very excited to play with this base and awesome decoupage papers of AnRa Crafts...Here is the overview video of the project I made--


LIST OF MATERIAL ---
A wooden sewing machine drawer from TECS..
Wandering Jane decoupage paper of AnRa Crafts from TECS.
Modpodge Gloss 
Twines, ribbons, pearls, buttons, laces from my stash 
Temporary Tattoo sheets
Folk Art colors
Inka gold 
Wooden embellishments from TECS


 SO let's start making this wonderful piece...
Firstly i took machine's upper part and placed on paper where i wanted to get which pattern and cut paper upon markings. I cut down 1/4 inch lesser paper than the actual measurement and marking..

Now I took folk art colors and provided a base to whole wooden piece, after it dried, applied modpodge and adhered decoupage sheets as per my placement idea...


With the help of scrapper, I removed air bubbles and gave a smooth finish and let it dry...

After all sides are done, gave it a nice coat of modpodge and let it dry completely...


Now the time to decorate and alter the base....I took temporary tattoo of filigree designs and transferred upon base where I wanted as I wanted to try something new and these came out very beautifully.....


After it dried completely, I started decorating it with pearls, laces, buttons and wooden embellishments... 


Then I touched it up with Inka Gold on all edges to give it a vintage n altered look...


 At last, I did a bit stamping as final touch.....


Hope, you all would have liked the post and my altered sewing machine drawer...Give your love in form of feedback msgs and share the post....

Love you all...Jinnu


Wednesday 11 April 2018

Lampshade using TECS Decoupage Papers

Hello my crafty friends......


It's me,Arpita here on the blog today....with a simple yet a beautiful project.I received this gorgeous lampshade base by THE ELEMENT CRAFT STUDIO and fell in love with this piece instantly,its so beautifully designed and conceptualized. I also received their recently launched decoupaged papers,which are 100 gsm papers with great prints,lovely colors and has a great texture,I absolutely loved working with them.So here is what I made.....


Tutorials

1 .I roughly cut the decoupage paper to size of the panels adhered them using modpodge one panel at a time,sanded the extra paper..once done with all the panels I applied a coat of modpodge and 2 coats of varnish.

2 .Next was to paint the stand,i used lilac chalk paint...applied 2 coats of the chalk paint and to add some interest to the stand i decided to do some gilding using a silver leaf and did some stenciling using modelling paste on the base of the stand.

3. Finished it by adding a lace trim and some beads to the top part of the lampshade.

ThankYou for stopping by...
see you soon with another interesting project,till then
HAPPY CRAFTING!!!

Arpita


Friday 6 April 2018

My Little Princess Explosion Box

Hello friends, Jinal here....
Today I have an explosion box made from TECS's paper pack "My Little Princess" to share with you all. I love making explosion boxes but baby explosion box I have tried for the first time and loved the pack completely... lots of fussy cutting...layering..have tried using less of stamp n outer stuff as papers are a complete package itself to make any album, card or box... 

First I am posting video of the box...In that video I have specified why I have kept this style.... hope you will like my idea for using this papers...


Lets get started... Material used are paper pack "My Little Princess" from TECS. White iris Card stocks Glossy assent.glue scissor. Distress ink picked raspberry. Laces and button pearls from my stash... Have used minimal product from outside and used more of papers only.... 

Procedure----Take 12 by 12 card stock...and score at 4/8/12 on both sides... So you will get 9 equal parts... Chop of the four corners... As in the pic..
                           
  Then next layer take a bit smaller size from the first layer ,chop of the corners.. Layer it with pattern paper front and back according to your wish...
                                             
  After that take a 9x9 inch card stock score at 3/6/9 on both sides...n just slit all four corners and stick the pattern papers as shown in d video....stick the paper in such a way that when all the pieces are opened one whole pic is seen...and then make a 2x2 inch magnetic box...in which you can put small teddy /gift/ few chocolate.... Make a squash for 2 sides of first layer.... For folded pop up card for 2nd layer....
For the lid have done fussy cutting of teddy, fairy...lamb and other stuff....used lases and buttons, pearls to decorate the box...


Looking forward for your valuable feedback about the box...thanks... Love, Jinal..